Cave Of Trials
Yep, like every other game in the series, this place has a bonus dungeon where really tough monsters and really great prizes await you! To get to it, you have to return to Expel. Get up to the last save point in Fienal, then go all the way back down. Go to Fun City and enter the Battle Arena. Go around to the back of the spectator's seating and talk to the "Mysterious Old Man", who'll offer to send you back to Expel. And he will! You'll end up back in Arlia Village. To return to Nede, just talk to Vern Vern, the purple penguin in the fenced-in area. Tell him "You silly Vern Vern!" and he'll get mad and boot you back to Nede. That's how you travel back and forth.
Of course there's more; go outside and you'll find a Synard waiting for you! The Cave of Trials is in the southwest desert. Note that doing the Raddle sidequest before leaving Expel will make this dungeon a bit easier. If Ernest is in your party, take him to Mars and Linga and pickpocket him for Battle Suits. That also makes it a hell of a lot easier. 8-)
The Cave has 13 floors. There are no save points anywhere! There are quick exits in Levels 6 and 11, and there's a special (and expensive!) item called Go Home Frog which lets you exit whenever you want. There's also a shortcut to the 9th floor on the 1st floor. There's a boss before (almost) every staircase down, and you get special items for beating it. Take my advice and never try to do more than one floor at a time; exit after every floor, save and heal. Without further ado, we go to floor number 1, and from this point forth, the text belongs to Jessica and my own comments will be in [ ] as usual. The end of every floor will have a map made by me, and my rundown of what can be found in each room. Dead-end rooms are generally not shown on the map for ease of view.
Items: Fruit Nectar, Blueberry, Tri-emplem, Juicy Beef, Wonder Drug, Nuclear Bomb, Bunny Shoes, Link Stock
Enemies: Livingarmor, Warlock, Weirdknight, Gloomwing, D-feather
My only bit of warning about this level is that you avoid the room with with a square of red tiles like the plague until you've cleared out Levels 1-9. In this room you will see the floor has light filtering through cracks between the tiles. If you walk over the leftmost portion of this cracked area four times, the floor will deteriorate and you will plummet to Level 9. However, even if you manage to wade through the monsters and defeat the boss you cannot return to the previous levels since the door to Level 8 MUST be opened from the other side. So the only alternative left is to finish out the Cave or to re-load.
That being set aside, the only strategy I would recommend with the monsters here are to make sure you keep those Warlocks busy. An efficient spell caster will do the trick nicely. The Living Armors can pose a problem for your fighters, as they can turn their defenses very high (they will glow in "rainbow" colors) and can only be struck from the back. [When they turn invincible, though, they won't attack! Leave them for last.] Magic will never affect them either, so make sure you have at least one good fighter in your party at all times.
Item of interest: Link Stock
The Link Stock is a precious item that becomes useful if you plan on equipping a Link Combo accessory. With this, you can "steal" Killer Moves from the Link Stock without having to steal them from your allies. A must for any warrior :)
Boss: Darkfeather
Darkfeather is a succubus-like creature that can give you trouble or fall rather easily. She is accompanied by two weirdknights who are easily defeated, and should be first thing. Attack wise, she doesn't have a large variety. She can cast Daemon's Gate, which causes moderate damage to decently protected allies. She also has three primary physical attacks: a slap, a swooping dive, and a projectile that resembles a wing or fan. When she moves around or stops and waves her hand, you'll have trouble hitting her. If you can manage to knock her unconscious (indicated by yellow stars that circle her head) you should be able to keep a steady flow of hits going. Using multiple hit Killer Moves such as Dias' Illusion, or Ashton's Sword Dance help tremendously.
Your prize for a victory is access to level 2 and a pair of Bunny Shoes! Bunny Shoes are very useful in this dungeon as well as with the final boss, as when equipped they allow your characters to run with lightning speed across the battle field. They also boost your STM level by 80 points. [If you don't have a pair yet, you can steal one from the bunny at the races in Fun City, which means two fighters can now have them!]
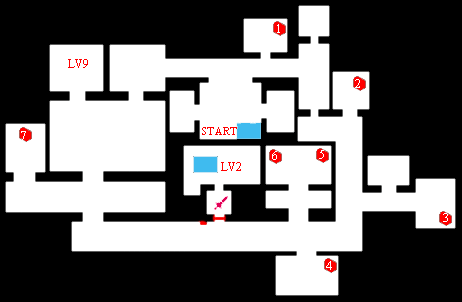
| 1: Fruit Nectar | 5: Juicy Beef |
| 2: Link Stock | 6: Wonder Drug |
| 3: Nuclear Bomb | 7: Blueberry |
| 4: Tri-emplem |
Items: Purity Leaf, Link Combo, Reflective Armor, Resurrection Mist, Seraphic Garb
Enemies: Giant, Huntinggel, Cavesting, Weirdaxe, Bloodgerell
Love Alley presents the player with a rather strange puzzle to solve. Near the entry stands a large stone tablet with some rather vague clues written upon it that weave the story of a great love story between several people. Rotatable statues placed throughout the level correspond to each person and must be rotated so they face the person they love the most. The solution is as follows:
Milene faces Luke (south) Luke faces Milene (north) Feria faces Luke (east) Yufie faces Lloyd (south) Lloyd faces Cistina (east) Sharon faces Yufie (west) Cistina faces away from all (south)
Monsterwise, this level offers a few challenges you will want to be aware of. First there are the Giants, gorilla beasts with extremely powerful attacks and surprising speed if you haven't acquired a few pairs of Bunny Shoes yet. The Weirdaxes have a very swift attack that will bother even the fastest-hitting fighter, so do use caution when proceeding from statue to statue.
Item of Interest: Purity Leaf
The purity leaf, though not a very important item, is nice if you want to cook up some powerful meals with the Cooking Specialty. As far as I know, you cannot buy it anywhere but you CAN reproduce it.
Boss: Bloodgerell
This boss is a real pushover, and is accompanied by four Huntingels. Bloodgerell can stone you, so be protected adequately. All of these monsters can multiply and will if left idle or when they weaken. Also, these monsters will all attack by throwing projectiles, but seem to be knocked out easily.
For this easy victory, you will receive passage to level 3 and a Seraphic Garb. This is a nice piece of armor to equip on characters who stay hurt more often than not. As HP goes down, the defense rate of your ally will go up. This seems to work, so I highly recommend using it.
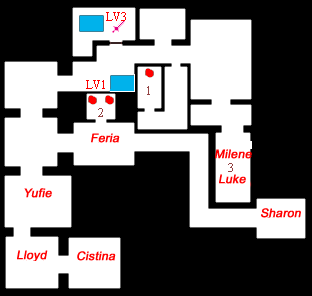
| 1: Purity Leaf | 2: Reflective Armor, Resurrection Mist |
| 3: Search ground for Link Combo | |
Items: Slayer's Ring, Fruit Nectar (x2), Sylvan Mail, Wonder Drug, Dream Crown, Juicy Beef
Enemies: Bloodgerell, Weirdgoat, Lesserdemon, Warlock, Dreamshade
This level can become quite frustrating, unless you have a very keen sense of picturing the layout here or you draw a map. The idea is simple: to open the door to the boss, you simply have to visit every room without repeating a room twice. There are several solutions that will work; here is mine.
From the main entry, you will want to head out the rightmost exit. Head right again, then down, then you will want to go left three times, up three times, then right three times, the last room having a hallway that turns downward. After exiting this downward turn, you will proceed left twice and then down and that should open it up!
Fighting will grow steadily more difficult from now on, with few exceptions. Speed will become the most important element in the levels to come, and this one is no exception. The battle with several Lesserdemons can be deadly, as they move very quickly and can leap upon a character, biting him or her for severe damage. Try controlling a good fighter, making sure to move in, strike and then run before a pack of demons descend and attack. [The Weirdgoats are pretty easy when they're alone, but not when they accompany Bloodgerells. Cast Anti when you fight them; their Firebolts are fast and do more damage than they should. Silence almost never works.]
Item of Interest: Slayer's Ring
The Slayer's Ring is a most wonderful accessory, especially if you prefer to conserve Killer Moves. When equipped it allows you to execute several strikes on your opponent with only one push of the X button. This seems to render the opponent unconscious quite often, which is useful in any battle you may incur during your travels.
Boss: Dreamshades
This fight features three Dreamshades, hourglass creatures that possess the ability to stop all movement of your allies on the field. This can be extremely dangerous, as the Dreamshades will take the opportunity to attack your frozen characters. Problems will definitely arise when the Dreamshades begin to use Dream Peace in succession, leaving you helpless for several seconds. Try to force your magicians to cast spells with short charging times, as to keep the enemies busy. This will not only soften up the Dreamshades, but will also allow your fighters to finish them off with ease.
You will also be permitted to enter level 4 and receive a rather useless item, the Magical Drops. This is an in-battle item that is supposed to have a similar effect as Dream Peace, though personally I never had successful use with this one.
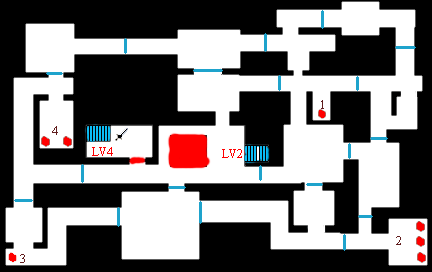
| 1: Sylvan Mail | 2: Wonder Drug, Dream Crown, Juicy Beef |
| 3: Fruit Nectar | 4: Slayer's Ring, Fruit Nectar |
[Room D has a Wonder Drug, Dream Crown, and Juicy Beef; Room G has a Fruit Nectar; Room I has the Slayer's Ring and another Fruit Nectar; and Room O has the Sylvan Mail.]
Items: Fruit Nectar, Black Earring, Peep Non, Resurrection Mist, Purity Leaf, Seraphic Garb, Illusive Shamisen, Extinction spell
Enemies: Huntinggel, Punkponk, Miel32
In this level, the Cave of Trials introduces an old trick handed down from the days of Zelda 1 on the NES--invisible doors in walls. Near the entry, you will see two boxes placed in what appear to be sealed rooms. Fear not, simply approach the middle of each wall from the bottom and press against it, you will hear a chiming sound and will walk through the wall. Claim your treasures and then head right. You will see a thin wall separating two large rooms; again, press near the bottom area of the partition and you will slide to the other side. Pull the switch and then head back to the room with the treasure boxes and the fighting man. Now the sealed door is open, head inside after confirming which character has Music Talent Specialty of Level 10, if not battle and level up until you acquire enough SP to master Music Talent. Upon entering you will meet the Dancing Goddess who will ask you to select a character to play a song for her. Pick any character whose Music Talent has reached Level 10 and she will be delighted. (Note: This is also a good way to learn what instrument each character is best at playing, as they will play their favorite for the Goddess). If you have won her over, she will give you the Illusive Shamisen, one of the two "hidden" instruments in the game. [If not, you can try again with no charge.]
Punkponks, a difficult version of the infamous rabbit monsters with boxing gloves, are the primary foes you will encounter throughout level four. They raid your party often, and can be difficult to defeat since they can reject your fighters very easily. [Magic and long-range techs like Dragon Howl or Alpha on One work very well. If you're using Noel, turn off Earthquake, because it won't work.] Occasionally they are joined by Huntinggels, so this level is rather boring with battles.
Items of Interest: Illusive Shamisen and Extinction
The Illusive Shamisen is a neat little instrument because it features two very powerful songs. The first, "The Green Gale", increases your AGL rating by when played, though the difference is hard to tell at times! :) The other song, "The Secret Power", will be the one you'll want to play when building weaker allies. It temporarily raises both HP and MP during the next battle, with a quick Fairy Heal or Cure All you can have your allies on 9999 HP easily, as well as having 999 MP with a few Blackberries.
Extinction is a very powerful spell for Leon that you will also discover on this floor. Though it costs 90 MP, the power it packs allows this spell to live up to its name, causing an average of over 9000 damage points per use. However, you will only be able to claim this treasure if you are adventuring in Claude's scenario, otherwise you will see the message "This is useless to us" when you open the box.
Boss: Miel 32
Defeating the Miel 32 should pose no particular difficulty, with a few fast and aggressive fighters in your team. Normal hits and the Slayer's Ring, Meteor Ring, or Gale Earring make a deadly combination against the ant-like missile shooter. Although its HP is quite high, Miel 32 is alone and so keeping it busy comes rather easily. Your only prize for victory is passage to level 5.
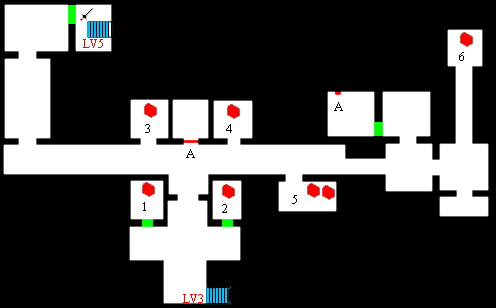
| 1: Fruit Nectar | 4: Peep Non |
| 2: Extinction Spell | 5: Resurrection Mist, Purity Leaf |
| 3: Black Earring | 6: Seraphic Garb |
| Switch A controls door A; green lines are walk-through walls. | |
| Door A contains the Goddess of Music and the Illusive Shamisen. | |
Items: Fresh Syrup, Slayer's Ring, Wonder Drug, Juicy Beef, Fruit Nectar, Fairy Ring, Seraphic Garb, Weird Slayer, Red Lotus Gem
Enemies: Dragonaxe, Ladyquimira, Atlus, Gloomsting, Greatergoat, Dreamshade, Weirdbeast
This level tries to sprinkle a bit of humor into the Cave of Trials by introducing you to Puffy, an egotistical and clumsy lady that roams this floor. [Most of what she says makes no sense, because she's originally from Star Ocean 1 and there are some references to that.] You meet her very early into the level, where she sends some rather confusing signals towards the party. She asks you to guess her name and then asks what of three objects suits her best. For perfectionists, choose "Puffy" as her name and "A Beast" for the second answer. Regardless of the answers you choose, she will summon the Weirdbeast to torment your party. You will soon discover even your most deadly spells and Killer Moves only register one point of damage at a time. Unless you desire spending hours and hours chipping away at his over 800,000 HP, just run away and both Puffy and Weirdbeast will exit. [It IS possible to beat the beast by using cheat codes etc., after which you'll get the Red Lotus Gem.] You will meet Puffy later on, in a situation that should seem familiar to you (note Rena's comment). Help the damsel in distress and she'll run off again, dropping a claw-like weapon called the "Weird Slayer". Hmmm...sounds useful, eh? [It's actually Chisato's best weapon!] After a bit more exploration, you will find Puffy yet again turned disgracefully towards the wall. Talk to her and find out the Weirdbeast has escaped with the key to level 6! Now head towards the beginning of the floor, and in an empty room you will see Weirdbeast. Defeat it, and you will receive the Red Lotus Gem, the key to the next level down.
The beasts that lurk on level 5 have incredible fighting power and can destroy your team in the the blink of an eye if you're caught offguard. Ladyquimirias, a hybrid of woman and spider, can teleport across the battlefield and will attempt to trap fighters amongst them. They seem to block quite a bit of your hits too. Dragonaxes have a very rapid and deadly strike that can down even the most speedy ally in a few blows. Use caution when proceeding and try the "hit and run" method for both of these adversaries. [The Greatergoats can cast Silence and Earthquake, so get rid of them first when you fight them!]
Items of Interest: Weird Slayer and Seraphic Garb
The Weird Slayer not only serves as the key to killing the Weirdbeast, but it also makes a fantastic weapon for Chisato. It will also kill almost all the monsters you will encounter with the name Weird in their names except the WeirdDevil from level 8.
You'll find another of those great Seraphic Garbs here, don't waste this great piece of armor.
Mini Boss: Dreamshades
Same exact fight as before, just follow the same strategy you did the first time :)
Boss: Weirdbeast
This has to be the EASIEST boss fight ever. Equip the Weird Slayer on either Rena, Bowman, Chisato, or Precis and after one hit, the Weirdbeast will be no more.
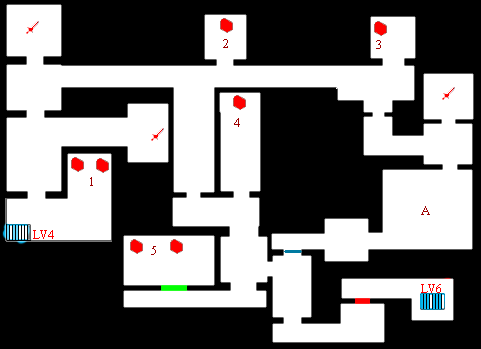
| 1: Fresh Syrup, Slayer's Ring | 4: Juicy Beef |
| 2: Wonder Drug | 5: Fruit Nectar, Fairy Ring |
| 3: Seraphic Garb | |
| Room A has your first fight with the Weirdbeast. | The blue door only opens from the top. |
| The final fight with the Weirdbeast can be in any of the rooms with a sword in it. | |
Items: Cure Poison, Dream Crown, Funny Slayer
Enemies: FunnyThief, Dragonaxe, Dreamshade, MetalFunny, F-thiefL99
Weary warriors will welcome this level, as it features one of the two escape points. The only "puzzle" to solve is a simple flick of a switch. Eventually you will enter a room filled with several gray statues of FunnyThieves, simply examine the statue in the lower right corner of the room and choose to push the switch. Piece of cake, as Rena would say :)
Having the Funny Slayer will allow you to take advantage of those MetalFunny soldiers you will run into. A Funny Slayer can be acquired beforehand by doing the Raddle quest. When equipped, it will defeat those speedy MetalFunnys in one hit, as the Weird Slayer does with the Weirdbeast.
Person of Interest: Santa
Occasionally, when you enter the statue room of level six, you will find the Santa merchant. His wares will empty your wallet quickly, though he sells some useful items that will aid you greatly in your adventures such as the Tri-emblem, a far more powerful version of the Tri-emplem accessory. Go-home Frogs are useful as well, for leaving the Cave of Trials quickly. However, they will only allow escape from the Cave of Trials. The Santa's Boots are more a novelty than anything, and a darned expensive one! When equipped it will randomly give items after staying in a hotel, not too useful but you may receive a few good items from it. If you're in dire need of those unusual metals and stones, Santa sells those as well. [Note that it's quite rare for him to show up, and if he's not there, you'll have to completely exit the Cave of Trials and re-enter to try to get him! Collect all your FOL before entering, because if you come here, finally get him, and realize you're short of cash, you are tremendously burned.]
Here is the Item list complete with prices, take a look and you'll see just how pricely his wares are!
Moonite: 1,500 fol
Orichalcum: 10,000 fol
Meteorite: 5,200 fol
Mithril: 15,000 fol
Damascus: 6,400 fol
Rune Metal: 7,000 fol
Green Beryl: 500 fol
Sapphire: 800 fol
Ruby: 400 fol
Star Ruby: 10,000 fol
Crystal: 500 fol
Sage's Stone: 50,000 fol
Diamond: 9,000 fol
Rainbow Diamond: 14,000 fol
Santa's Boots: 10,000,000 fol
Tri-Emblem: 5,000,000 fol
Go-home Frog: 300,001 fol
Boss: FunnyThief Lv 99
This is a multi opponent fight, with only 2 dangerous enemies to worry about. The three FunnyThieves in brown clothing will die fast [and do zero damage], so do not worry about them at all. Concentrate on first defeating the Dreamshade and then with a Funny Slayer equipped, finish the Funny Thief Lv 99 with one swift blow. The trick is to execute a successful strike, which may or may not prove difficult. FunnyThieves move very rapidly and swing thief swords with equal speed, and can wreak havoc on a lone fighter if he strikes first.
For winning, you will receive a Funny Slayer, and passage to both the Escape point and level 7. When you use the Escape point, you will be automatically transported to the entry room on level 1. [Now that you have at least one Funny Slayer, I highly recommend leveling up to level 100 before attempting the next floor, which is BRUTAL. The MetalFunnies give nice experience and are fairly easy, and the other enemies don't pose much of a problem. Also the Dreamshades drop Magical Drops (or you can Reproduce them), which will be extremely useful in the next dungeon.]
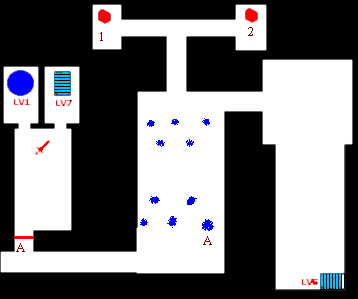
| 1: Dream Crown | 2: Cure Poison |
| Switch A opens door A. | |
Items: Tri-emplem, Fresh Syrup, Resurrection Mist, Ganze Sea Urchin, Purity Leaf, Peep Non, Weird Slayer, Bunny Shoes, 'Ishidaya' Tea, Yukiyachu Tea, Cracked Gem, Million Staff
Enemies: F-thiefL99, Orbiterbeast, Lastavenger, Meigus, Robinfake, M-eater
Nothing too difficult in navigating through this level, just make your way through, taking caution of the dangerous battles you'll most likely encounter. Far into the east wing of this level, you'll find an item called the "Cracked Gem" in a treasure box located in the room with the invisible door. This is the key for opening the door, however in its present state it will not do. You must use the Metalwork Specialty to transform it into a Red Lotus Gem. I, being the careful type, always exit the dungeon and save before, though I'm not sure you can fail. Once the Red Lotus Gem has been completed, talk to the stone tablet next to the altar with the pedestal. Then, place the Gem upon the pedestal to open up the door leading to the boss.
This level features probably the most lucrative battle for gaining experience, especially if you have made a few Extension cards (an in battle item that grants twice the experience points after battle). In one particular fight, your party will be raided by several FunnyThief Lv99's; though a challenging battle (even with a Funny Slayer equipped if you're not careful [use a Magical Drops at the start of the fight if you have an extra, and ALWAYS have one fast character equip the Funny Slayer]), with an Extension card you will receive a whopping 600,000 exp! To make an Extension card, use the Art Specialty; Celine tends to make these quite often. You can even reproduce them if you wish. The other monsters in this level can be quite frustrating to conquer. Robinfakes will bombard you with arrows from long distance, Last Avengers will victimize lone allies, and Meigus will cast Noah to drown you all. The disadvantage will probably be that with the Funny Slayer equipped, the battles will grow longer with the other enemies due to its low attack rating. The key to this level: Proceed with Caution.
Item of Interest: Bunny Shoes
Another pair of those oh-so-coveted greaves lie within the Goddess' Altar. Trust me, in the levels to come you will need them, so make good use of every pair of Bunny Shoes you have so far acquired.
Boss: Mithril Eater
Not the most aggressive boss, the Mithril Eater should remind you of the Barker monster found in the Milne Mine on Energy Nede. The Mithril Eater has only one attack "Lost Patience" that is devastatingly powerful, even to highly protected allies. He doesn't seem to use this attack very often, especially if you manage to keep him unconscious. Just keep hacking away, and of course, if you have them use multi-strike Killer Moves OR the Slayer's Ring and plain old regular hits. You'll gain 60,500 experience and 60,000 fol.
The Million Staff will come into your possession after settling the score with Mithril Eater, as well as passage to Level 8. This staff will boost your magic power by an incredible 800 points! The even better thing is that Noel can equip it, making his magic attacks and healing many times more powerful than ever before! I know a lot of players don't care for the Noel character (even if I personally seem to prefer him to Rena, but that's another issue...;). Celine [and Leon!] can equip this wonderful mage's weapon as well.
Stats for Million Staff
Atk: 800
Hit: 80
Mag: 800
Stm: 30
Luc: 30
Crt: 40
Special effect: Converts 1/5 of damage from spells into user's own MP.
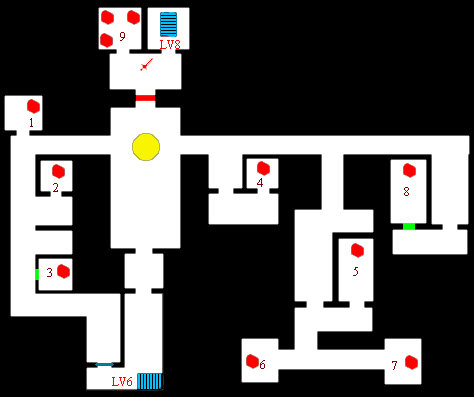
| 1: Purity Leaf | 6: Resurrection Mist |
| 2: Peep Non | 7: Ganze Sea Urchin |
| 3: Weird Slayer | 8: Cracked Gem |
| 4: Tri-emplem | 9: Bunny Shoes, 'Ishidaya' Tea, Yukiyachu Tea |
| 5: Fresh Syrup | The blue door only opens downward. |
Items: Lavender, Funny Slayer, Seraphic Garb, Amoeba Soup, Slime Jelly, Soda-Pop, Million Staff, Wonder Drug, Fresh Syrup, Ganze Sea Urchin, Special Tuna, Peep Non, Gelatin Steak
Enemies: Killergigant, Foriger, Weirddevil, Starguarder, E-beast
Hmmm..this level only features one enigma to dissolve, but it's one of the strangest around. At one point, you'll come upon a wall with a chubby face of a demon painted on it. Examine it, and the "Food God" will ask you to feed it the dish that's the most delicious. I still haven't exactly figured out how this one works. Eventually, after feeding it so many times, the herb Mandrake will appear in the list of foods available to feed the "Food God". Offer the Mandrake and you'll find out who was consuming all that food--it was Puffy! Though not dead, she's not feeling up to par due to the poisonous Mandrake she just downed. (Serves her right, I say "grin"). This will open the door leading to the boss.
Monsterwise, this level is sort of a breather after the horrors of level 7. The hardest fights will be those against the piggish dog creatures called Forigers. They are often accompanied by a Dreamshade, which of course poses the threat of using Dream Peace, so try to defeat the Dreamshade first and then concentrate on slaying the Forigers. [Another monster you'll see here is the Starguarders. They drop Star Guards, and if you equip one and let them hit you, they'll die instantly from the stars you give off! Eternal Sphere does the same thing, so Claude can mow them down. The Slayer's Ring and other similar accessories do NOT have this effect, for some reason, though. The Weirddevils are nasty and don't die from the WeirdSlayer, so equip your strongest weapon and get rid of them quickly; they tend to gang up on you with other enemies.]
Item of Interest: Special Tuna and Million Staff
The Special Tuna is one of the more useful foods in Star Ocean: Second Story. It replenishes your HP and MP by 70%. Good when you're out of everything else and you need some heavy recovery.
If one isn't enough, how about two? Yes, on this level there is yet another Million Staff to add into your inventory. Same stats, same selling price.
Boss: Erysin Beast
The Erysin Beast is one of those nasty worm creatures that can eat one of your allies and suck the lifeforce right out of him or her. Although there is only one, the "E-beast" has an enormous number of HP and will take quite a while to bring down, and if you don't knock it out, mostly likely it will begin to block your hits. [Long-range techs are a must; you'll use most of your Blackberries in this fight. If you bring more than one fighter character, chances are he/she will be swallowed early, so have that in mind. And chances are that the Beast WILL NOT spit out that character at all until it dies.]
A Gelatin Steak will be your reward for slaying the Erysin Beast. A decent piece of meat the restores 60% of an ally's MP outside of battle.
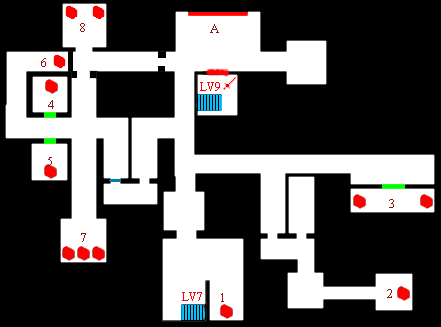
| 1: Lavender | 4: Soda-Pop |
| 2: Funny Slayer | 5: Slime Jelly |
| 3: Seraphic Garb, Amoeba Soup | 6: Million Staff |
| 7: Wonder Drug, Fresh Syrup, Ganze Sea Urchin | |
| 8: Special Tuna, Peep Non | A: Food God |
[I'll go a little more in-depth here because the layout is so complicated. You start at A, and B is empty. C is the central room here. First go out the bottom right to D. Down from here is E, which has a Funny Slayer at the right side. Right from D is F, which has a Seraphic Garb and Amoeba Soup; to get them, enter the invisible wall downwards from the middle of the room. Back to C, go left at the bottom to enter Room G. There's a one-way door here that leads to H (i.e. go through it and it'll close). H is another large room. To get the two chests in here, stand between them and first go up through one invisible wall, get the Soda-Pop, then down through the opposite wall to get the Slime Jelly. Circle around to the top left to get the Million Staff. Going down from here leads to room I, which has a Wonder Drug, Fresh Syrup, and Ganze Sea Urchin. Going up into the door on the right side leads to room J. Go up from here to get a Special Tuna and Peep Non in Room K, then continue right to end up back at C. The top right passage leads to a dead end. Go up to talk to the Food God and open the door, then go through it (from the top) and fight the Beast. Congrats. 8-)]
[A note: From now on, if you take my advice and leave after every level to save, you no longer have to go through all 8 levels from the start; instead, there's a room on the first floor which leads right to Level 9. See the first floor section for details.]
Items: Artemis Leaf, Valiant Boots, Resurrection Mist, Wonder Drug
Enemies: Cockatricking, Brigandogre, Weirdmalesk, Robinmaster,
This level, will at first seem rather odd, as you will not encounter a boss your first time though. Simply explore for now, getting the treasures scattered on this level, and then exit directly to level 10. You will return to this level later on, and find out the true purpose of the Sealed Coffin.
Robinmaster, a stronger version of Robinfake, resides on this simplistic floor. Just as her counterparts, the Robinmasters will pummel you with arrows from a distance, and tend to block attacks and then quickly counterattack. Cockatrickings can stone you with their missiles, so be sure to protect yourself adequately. Nothing too very dangerous here, if you allocate your allies amongst the opponents well. [This means giving one fighter the Weird Slayer to kill the Weirdmalesks, who can swallow you; and your healer having a Stone Check (and as many other characters equipping one as well) for the Cockatricking fights. Starting now, I find that regular attacks with Eternal Sphere or Slayer's Ring work better than multi-hit techs.]
Item of Interest: Valiant Boots
A nice pair of greaves, if you don't mind sacrificing the speed of the Bunny Shoes. If you're going to have a fighter in the back, (example: Dias throwing Air Slashes from afar) these will suit that ally nicely. For sticklers on matching armors, these are a MUST for completing that FANTASTIC Valiant ensemble. :) [EDIT: Valiant Boots actually give the same speed bonus as the Bunny Shoes do! The only thing it doesn't have is the 80 STM bonus, but hey, with an extra 200+ defense points, who needs it? 8-)]
Boss: Wise Sorcerer
The only real danger in this battle will be the three Dreamshades that accompany the Wise Sorcerer. Be sure to defeat them first, and then conquering the lone wizard should be a fairly hassle-free task. You'll gain the incredible, legendary Levantine Sword. What's more, despite being only one sword, Ashton can equip it just as Dias and Claude can! Perhaps a bit lazy on the part of the game designers, but you won't hear ME complaining ;)
Stats for the Levantine Sword
Atk: 3,000
Hit: 50
Guts: 50
Stm: 50
Crt: 50
Special effect: Grows in power as the user is in danger
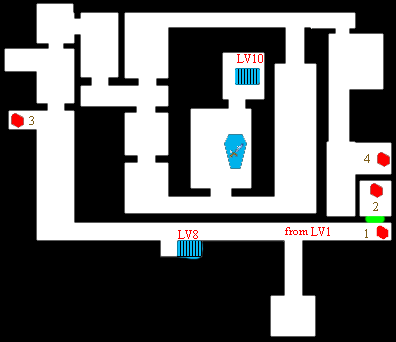
| 1: Artemis Leaf | 3: Resurrection Mist |
| 2: Valiant Boots | 4: Wonder Drug |
Items: Funny Slayer, Bunny Shoes, Fresh Syrup, Valkyrie Boots (x2), Rainbow Diamond, Sage's Stone, Valiant Boots, Million Staff, Purity Leaf, Meteor Swarm spell, tri-Ace technique, Valiant Guard
Enemies: Liveflayer, Mindflayer, Miel128, Clubgunner, Geo-guardian
Note: From this point on, the battling reaches the level of extreme difficulty, and certain battles will seem impossible to win until your allies have attained levels in the late 100's. Be sure to level up appropriately, and equip the BEST armors, weapons, and accessories possible. [The Cave of Trials even looks different from this point onwards...]
As the name implies, you will be asked to decide what path you take to reach the end of this level. You will notice a square drawn on the floor separated into 16 tiles, stepping on the tiles will open certain doors. However, revealing a yellow or red tile will lead you to a "poisoned" room that will drop your HP [AND MP!] while you traverse inside it. [Yellow ones do it slowly and red ones do it quickly.] Total exploration of these rooms depends on the combination of tiles you step on. For the easiest path, begin in the upper right corner tile, and take two steps left, then take two steps downward, one left, and then go down again. This path is relatively short, and allows you to avoid any of those "poisoned" rooms. However, you will not collect any treasure following this path. Eventually you will come upon the room containing the staircase to Level 11. If you have Ashton in your party you will want to claim the treasure box before heading down. It holds the secret Killer Move tri-Ace. Now, when you try to descend the stairs, a robot will ambush your party.
Note: If you wish to avoid unnecessary fights for the moment, just follow the basic path to level 11. Immediately after you complete the Cave of Trials you will have the opportunity to collect all the boxes free of monsters and will all the doors opened.
Robots and worms are the name of the game here. There are several types of the ant-like missile shooting robots that vary dramatically in difficulty. The silver/lavender Miel128's will be the easiest to defeat by far. Mindflayers can be aggravating, as they shoot missiles that drain your MP with lightning speed. [But they can't do much to hurt you.] However, the pinkish Liveflayers will be deadly. Not only are they very quick to move, they shoot missiles in nearly impossible to dodge spray. Timing, speed, and luck will save you in this case. The Clubgunners aren't nearly as dangerous, however their Multiple Terror can mean instant death even with 9999 HP. Ghastricgels, the black worms, will gulp up allies quickly if the Dreamshade that often travels beside them gets the chance to throw a Dream Peace or two. So all in all, this level boasts some of the hardest regular battles in the entire game.
Items of Interest: Killer Move tri-Ace, Meteor Swarm, Bunny Shoes, Funny Slayer, Million Staff, Valkyrie Boots, Valiant Boots
Note: All items of interest, barring tri-Ace, are located in "poisoned rooms".
tri-Ace (yes, spelled exactly the same as the company who created Star Ocean: Second Story), will become a useful Killer Move to equip for those long battles where close-range fighting can be fatal. However, only Ashton can use tri-Ace, so Opera fans, you'll have to miss out on this one :) A bit expensive to use, costing 45 MP per use, this powerful KM has Ashton invoking the power of "the Almighty Tria" to "overthrow all the enemies!" Few monsters will be able to block this one, as it damages all enemies present on the screen and with high numbers. Probably one of my top three favorite KM's in SO: SS. (The other two are Dias' Air Slash and Ashton's Sword Dance). But I'M not biased towards swordsmen :D
Meteor Swarm, a celestial spell for everyone's favorite treasure hunting witch Celine, matches Leon's Extinction in terms of power, and in length of endurance. Costing 80 MP, this one works quite effectively despite the long casting time, which players who use Celine often should be used to. :>
If speed is your need, then rejoice! The third pair of Bunny Shoes lies within your grasp. (Did that sound a little too Noel-esque?)
For your leveling-up convenience, a third FunnySlayer to add to your weaponry. Take this one to level 7 when you feel the need to fry some Funnies.
Three is the secret number on level 10, you'll find the third of those amazing Million Staffs here to power up those mages.
Valkyrie Boots will suit any lady warrior who desires the maximum in defense. These will work nicely for Celine or Rena, as being both magicians, will stay in the backlines without a dire need of the Bunny Shoes' speed. [Again: Valkyrie Boots DO let you have Bunny Shoes speed.]
The last of the power items you'll collect in this most generous level is a secondary pair of Valiant Boots.
Boss: Geo-guardian
This fellow should seem familiar to you from the Fields of Power and Courage. However, a steady stream of hits from your fighters will keep him locked up for the entire battle. If you catch him early enough, he most likely won't even be able to get a single attack off, making this battle somewhat of a breather after the long trek through level 10. He has two primary attacks, Release Punch and Smash Lash, and if you do not defeat him fast enough, he will transform into a small robot that will constantly use a potent laser attack called "Extermination". Geo-guardian, being a good sport, will christen you "Most Powerful in the Universe" as a nifty little bonus for defeating him :)
You will receive a Valiant Guard for defeating Geo-guardian. This shield gives a nice boost to your AC rating, and all male characters can equip it, so it's quite nice for Noel and Bowman who cannot equip some of the stronger mails.
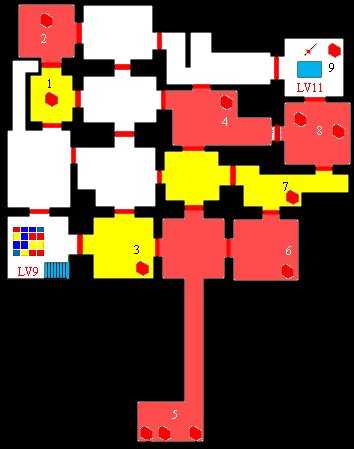
| 1: Funny Slayer | 3: Fresh Syrup |
| 2: Bunny Shoes | 4: Valkyrie Boots |
| 5: Rainbow Diamond, Valkyrie Boots, Sage's Stone | |
| 6: Valiant Boots | 8: Million Staff, Meteor Swarm spell |
| 7: Purity Leaf | 9: tri-Ace tech |
Items: None
Enemies: Mindflayer, Miel128, Dreamshade, Ghastricgel, Weird-mage, Hellmaster, Owlbear, D-tyrant
An extremely short level, with no puzzles, traps, or mysteries to solve. However, there is the second of the two escape points here, which will feel a blessing after the long and gritty battles you may have endured.
Another challenging level, featuring the likes of those nasty Ghastricgel worms, Weird-mages (which can be downed with a Weird Slayer equipped in a single blow) who will send Explode spells in your direction, as well as Hellmaster, a Shin-like demon armed with Spoiling and Word of Death. Occasionally, you'll be raided by a single Owlbear, who resembles the Geo-guardian very much. [Those fights offer a huge amount of EXP, but while they're not very tough (his attacking power is low) they'll take quite a while because of his huge defense power and 300,000 HP. Spells and the Below The Belt skill will help you in these fights.]
Boss: Dragon Tyrant
Though it resembles Synard more than a dragon, the Dragon Tyrant can be one of the more irritating bosses to battle. First, he floats, which can cause problems for striking outside of using Killer Moves. His powerful breath not only does severe damage, but it also can stone your allies, so be prepared. This is an excellent place to test out the tri-Ace Killer Move. It will allow Ashton to stay a fair distance from the Dragon Tyrant, while your other allies keep him busy. Projectile Killer Moves will be the way to go, but be sure to watch your MP as this battle can grow long depending on how often the Dragon Tyrant blocks.
In addition to a Valiant Guard [? I never got this...], you'll learn the last Skill 'Float' for defeating the Dragon Tyrant. With this skill, you will be able to pop the enemy into the air with your regular strike, which can be either helpful or harmful depending on what exactly you're fighting. If nothing else, you won't have that empty space bothering you at the bottom of the Skills list anymore. :D
Note: From this point on, when you re-enter the Cave of Trials, you will be asked if you would like to travel with only one companion along with the main character. [I think you have to actually try to enter the door to the next level before this happens.] This becomes necessary for entering level 12, but otherwise it doesn't serve much purpose except of course fighting is harder and escaping can be easier.
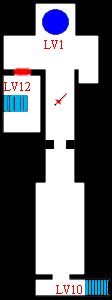
Items: Battle Suit (x2), Valkyrie Guard, Bunny Shoes
Enemies: Mindflayer, Miel128, Dreamshade, Weird-mage, Hellmaster, Owlbear, Ghastricgel, Phoenix
[Since you have to exit anyway, I highly suggest saving and then Reproducing or using Art to create more Discovery Cards, since later enemies drop incredible items. Also do a LOT of Compounding to make healing items, and Extension Cards if you're below Level 130. If you haven't met Santa yet, keep trying to go in and out of the Cave until you can buy at least four Tri-Emblems from him.]
Accessing the door to this level will put a heavy strain upon two unlucky warriors; for you have to brave the dangers of the Cave of Trials with only the main character and one additional party member. High levels will be useful, not only for the obvious reason of surviving, but also for increasing your chances of a successful escape if you find yourself facing an overwhelming battle. Escape formation should help out, should such an unexpected battle arise. Use the same pattern on the tiles for level 10, Decision Point and then quickly make your way through to the boss.
The monsters here are exactly the same as those in level 11, so proceed with caution.
Items of Interest: 2 Battle Suits, Valkyrie Guard, and Bunny Shoes
The Battle Suit is very similar to the Valiant Mail, the only difference being it bestows less of a Guts bonus than the Valiant Mail. However, anyone can equip this fine piece of armor, which gives it a bit of an advantage. It also sells for a sky-high 26,000,000 fol!
The Valkyrie Guard is the woman's equivalent to the Valiant Guard, and just as the Valiant Guard, any woman can equip it for a nice boost in AC value.
The last of the Bunny Shoes found in the Cave of Trials, allowing you a full set of these speedy greaves for an entire fighting party of four.
Boss: Phoenix
The Phoenix, even with only two party members, shouldn't hassle you all too much if you keep him a safe distance. Try using Killer Moves that throw long distance and high-reaching projectiles, such as Ashton's Hurricane Slash, or Opera's Alpha on One. With luck and good timing, the Phoenix will be thrown back and knocked unconscious most of the battle. Spell casters should try to stay in the back, helping with occasional attack spells, or perhaps boosting the stats of your fighter. Phoenix doesn't have all too many attacks. There is Master Attack, which will cause the heaviest damage. He can heal himself with Cure All and attack with Magnum Tornado if left untouched. Either way, the Phoenix doesn't have nearly the HP of the average boss, so victory should be no problem.
As a reward, you'll receive a vital key to completing the Cave of Trials, and accessing the deadliest swords in the entire game: the Holy Sword Farwell. Not only powerful in its own right, if you take it back to level 9, the coffin that lies there will open and reveal the boss that was lacking before. (See the walkthru for level 9 for more details on the boss).
Stats for the Holy Sword Farwell
Atk: 1,900
Hit: 70
Mag: 70
Crt: 15
AC: 70
Note: Just as the Levantine Sword, Ashton will be able to equip this one as well.
Note: From this point on, a full party of four can be taken to level 12, so worry not. The Phoenix, being a..well phoenix bird, will return to challenge you again and again, though at times he takes longer to come back than others. I highly recommend you re-group with your remaining allies before proceeding back to level 9. You will have to acquire the Levantine AND Holy Farwell Swords to open the door to the final layer of the dungeon, so returning will almost be mandatory anyhow.
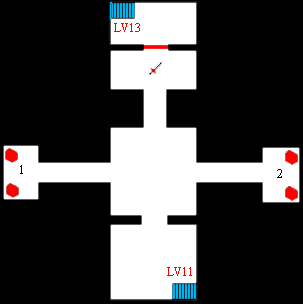
1: Valkyrie Guard, Battle Suit
2: Battle Suit, Bunny Shoes
Items: Valiant Mail, Valiant Guard
Enemies: Soulmaster, Hell-servant, Rock-demon, G-Celesta
Nothing too difficult in understanding this level. You'll want to pull the levers that you'll find in the wings that branch off from the main room. There are a few treasures to pick up along the way, but be careful not to trigger any unwanted battles in those empty "spaces" you'll find in the treasure box rooms. Though they perhaps seem to hold some hidden object or switch, they are basically traps to give you battles.
Not exactly a great variety of monsters lurk in the final level of the Cave of Trials. SoulMasters, yet another form of wizards, will probably be the foes you encounter most often, and will cast Extinction on your party if not kept busy. [Sometimes they appear with three Dreamshades; get rid of them first! Tri-Emblems will help protect against the spells.] Hell-Servant, cousin to the Phoenix bird, will probably bring the most troubles to your party. Not only does it boast a high amount of HP, the Hell-Servant moves quite quickly and will block many attacks. It can cast Meteor Swarm as well as using the ever-agonizing Master Attack. Rock-demons will blast your party to the netherworld with "Lost Patience" should you fail to keep them unconscious for too long. However, with a Discovery Card you may be able to receive a Valkyrie Armor from it randomly, so it's worth trying the fight if you're strong enough.
Item of Interest: Valiant Guard, Valiant Mail, Angel Armband, and Silver Trumpet
Same Valiant Guard as you previously have received, so waste not the opportunity to equip it.
The Valiant Mail is another great armor for warriors who want to maximize AC ratings. Gives a bonus of 60 Guts as well.
The Angel Armband will become a must should you wish to challenge the secret form of the final boss or the Iselia Queen, as it protects you nicely against every element. Star-elemental spells such as Southern Cross and Meteor Swarm will even heal the ally wearing this one, which has obvious advantages by far. Specified stats are as follows:
Hit: 60
AC: 60
Avd: 60
Guts: 60
Luc: 60
The Silver Trumpet is the secondary "hidden" instrument in the game, and offers two rather unusual tunes to compose with it. The first, titled "The Evil Power" allows you to summon the darker side of Gabrie, Iselia Queen. Do not summon Iselia unless you have an extremely strong team, plenty of revival items, and a whole lot of patience. She has 3.3 million HP to drain, and her attacks are more deadly than her alter ego. The second song is "The Melody of the Gods" and has a similar effect to using the Orchestra Super Skill, increasing the chances of a successful item creation even without the necessary talents.
Boss: Gabrie Celesta
The ultimate keeper of the final level of the Cave of Trials is an angelic being, Gabrie Celesta (perhaps a reference to "Gabriel" Indalecio's name in the Japanese version). [Actually, she's also from Star Ocean 1.] As you might expect she's quite a formidable opponent, but victory isn't as impossible as you might assume. Keeping her busy will be the top priority, which can be accomplished by tossing her around in a multi-strike Killer Move. She can cast Noah, Foehn and Star Flare, and boasts quite a few physical attacks. One is a cross-like projectile that will drill an unaware ally to a quick death. She also throws a disc-like object that whirls around, and seems to track allies which makes it very hard to avoid. She will also fly around the room protected by a circular barrier, which should remind you of the Warlocks from level 1, so try to keep an eye on her whereabouts at all times. The strategy I employed was to run in beside her, execute a multi-hitter KM and then run away and dispense the necessary items. She has a fair amount of HP, 1,000,000 in all but this goes surprisingly fast if you don't worry about draining those points rather than keeping her occupied.
[And now my tips. G-Celesta is apparently equipped with her own Valkyrie Guard, which means that EVERY attack you send her way will result in a shower of red stars. The solution is simple: De-equip the Eternal Sphere from Claude and the Star Guards from anyone who has them. Give Claude the Levantine Sword and either Dias or Ashton the Holy Sword Farwell. If neither are in your party, let Opera go in, but protect her well. If you have Leon, use him instead of Celine; if not, turn off all of Celine's attack spells besides Explode. Your fighters should have Bunny Shoes and your magic users should have as much Valkyrie/Valiant stuff as they can. Equip Pallas Athenas if you can. Inside the battle, having the correct items is the key; make sure to have as many Smelling Salts as possible (use Compounding to make them); Mixed Syrups can be bought in Lacour and are also very useful. Angel Statues and Goddess Statues are also great. Ashton's tri-Ace is awesome against the angel; with the Holy Sword Farwell, you're guaranteed at least 8000 HP per hit, and she can't defend against it! I have Claude keep using regular attacks with his sword; Mirror Slice can miss, and if she runs away Claude is stuck. So regular attacks work well, and if his Below The Belt skill is at Level 10, he'll frequently do 9999 damage with regular hits! Rena will use Gravity Press a lot in battle; though it does little damage, it can knock G-Celesta out of her spells, so keep it on. I recommend being at least at level 135 to be able to win this fight.]
This victory will leave you going home loaded down with treasures. You'll receive yet another Holy Farwell, and she will entrust you with the Silver Trumpet. Not only that, the treasure box behind her carries the Angel Armband, on of the best Accessories in Star Ocean: Second Story. As a nice little bonus, you'll get your chance to explore the entire dungeon free of monsters, with heroic music to take your "victory lap" in. [In Level 10, all the doors will be open and your HP/MP will not decrease in any of them.] Take this opportunity to collect any items you left undiscovered. You will note the escape points are temporarily disabled, but when you return to the dungeon they will be re-activated. The option to travel as two will no longer be available on your next visit as well.
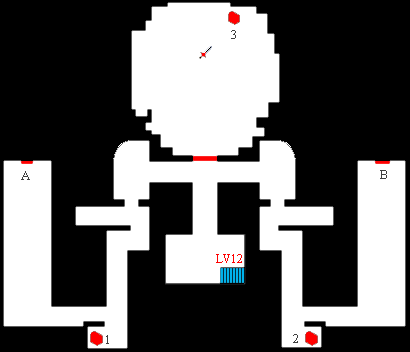
1: Valiant Mail 2: Valiant Guard 3: Angel Armband
Switches A and B open the central door.
TAGS: Playstation, Cheats, Hints, Walkthroughs, Codes

